Part 2: Fine Tune — Gemma 2b-it model
in collaboration with Nitin Tiwari (ML GDE)
This blog is part 2 of three blog series for a project called — SciGemma. In this blog, we will cover the second part of the pipeline i.e. FineTuning Gemma 2b-it model using LoRA.
End-to-End Pipeline
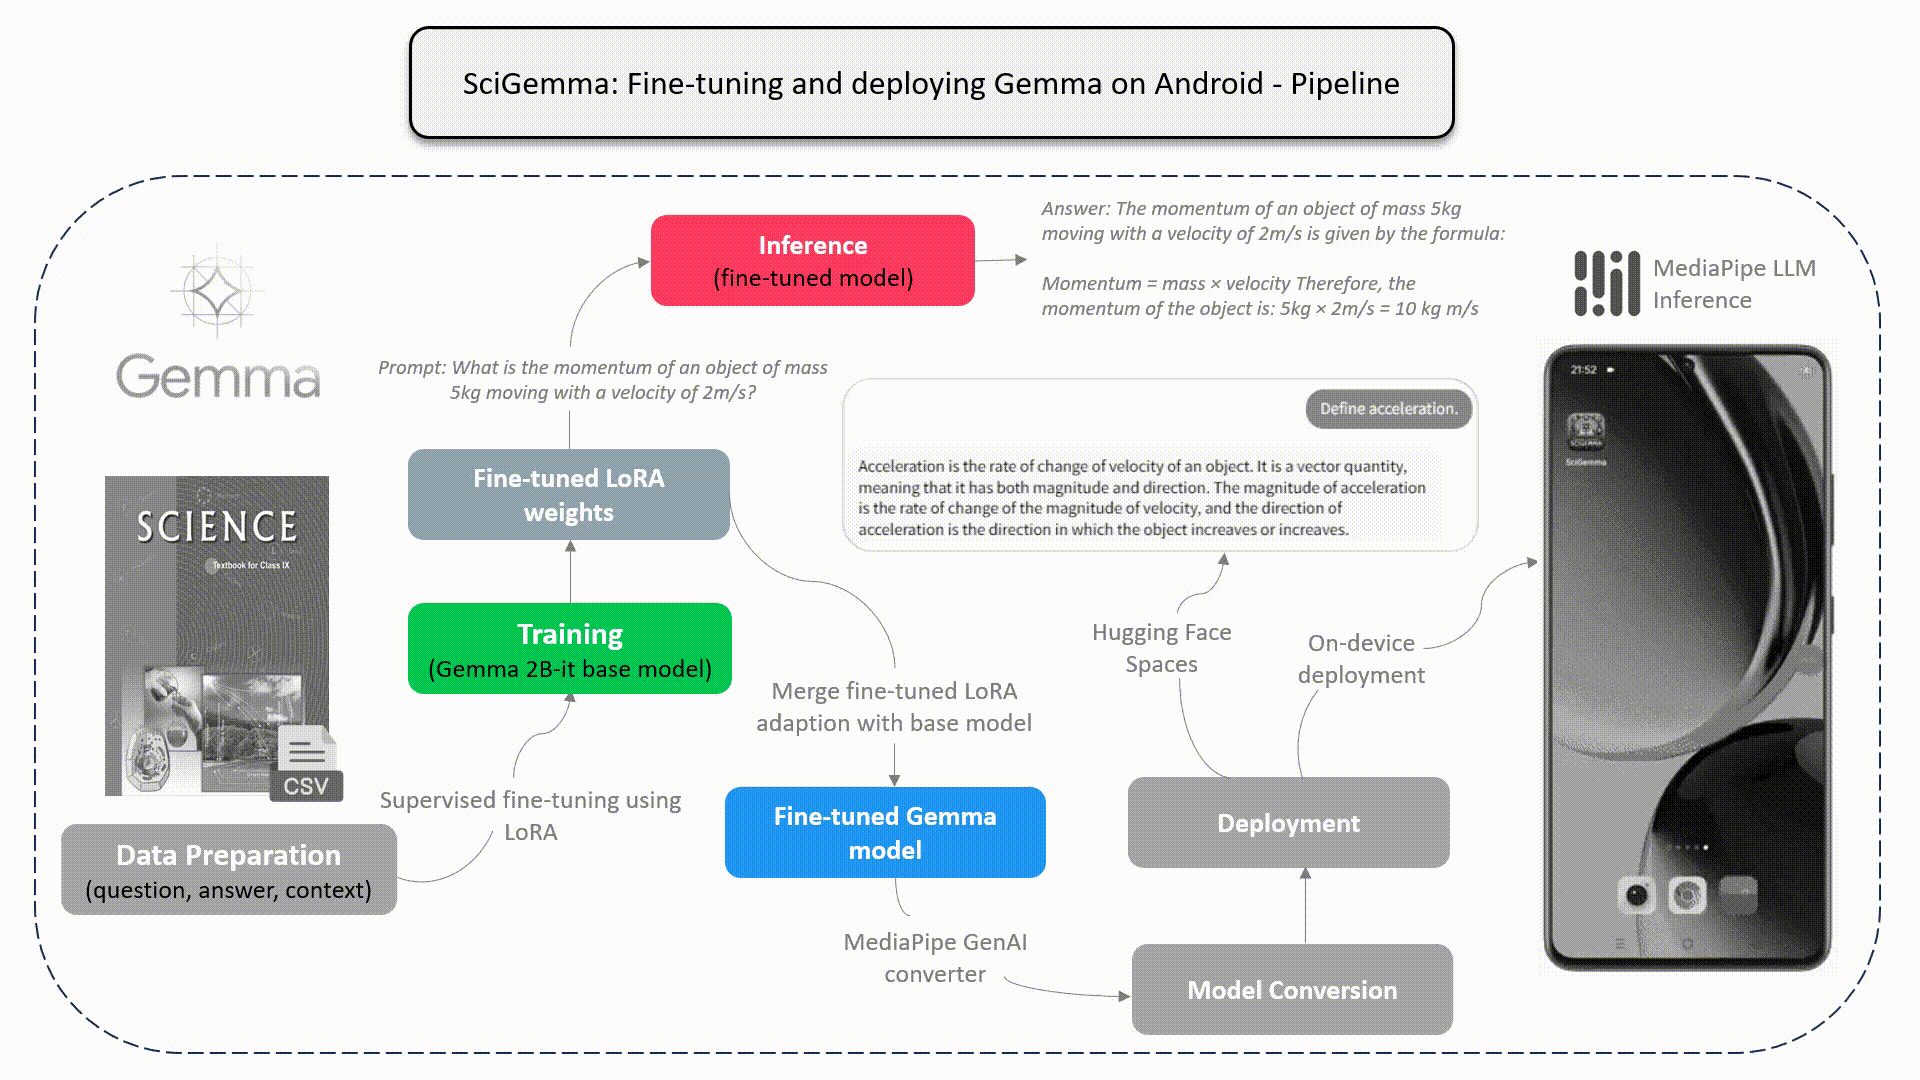
Gemma is a family of lightweight open models that are available in two variants- Gemma 2B and Gemma 7B, each released with pre-trained and instruction-tuned variants. It’s a state-of-the-art multilingual model inspired and driven by the same research as Gemini models. You can learn more about Gemma models here.
Let’s get fine-tuning ✨
Step1: Download the Gemma 2b-it base model
Start by downloading the base model and understanding its configs using BitsAndBytes for efficient inference. The model, configured for 4-bit quantization and optimized computation, is used to generate a continuation of a given text prompt. The tokenizer processes the input text, and the model generates a continuation, which is then decoded and printed.
import os
import transformers
import torch
from datasets import load_dataset, Dataset, DatasetDict
from trl import SFTTrainer
from peft import LoraConfig, PeftModel
from transformers import AutoTokenizer, AutoModelForCausalLM
from transformers import BitsAndBytesConfig, GemmaTokenizer

# Download Gemma 2b-it base model
model_id = "google/gemma-2b-it"
bnb_config = BitsAndBytesConfig(
    load_in_4bit=True,
    bnb_4bit_quant_type = "nf4",
    bnb_4bit_compute_dtype = torch.bfloat16
)

tokenizer = AutoTokenizer.from_pretrained(model_id)
model = AutoModelForCausalLM.from_pretrained(model_id,
                                             quantization_config = bnb_config,
                                             device_map={"":0})
Let’s check the base model inference for text generation and see what the base model returns.
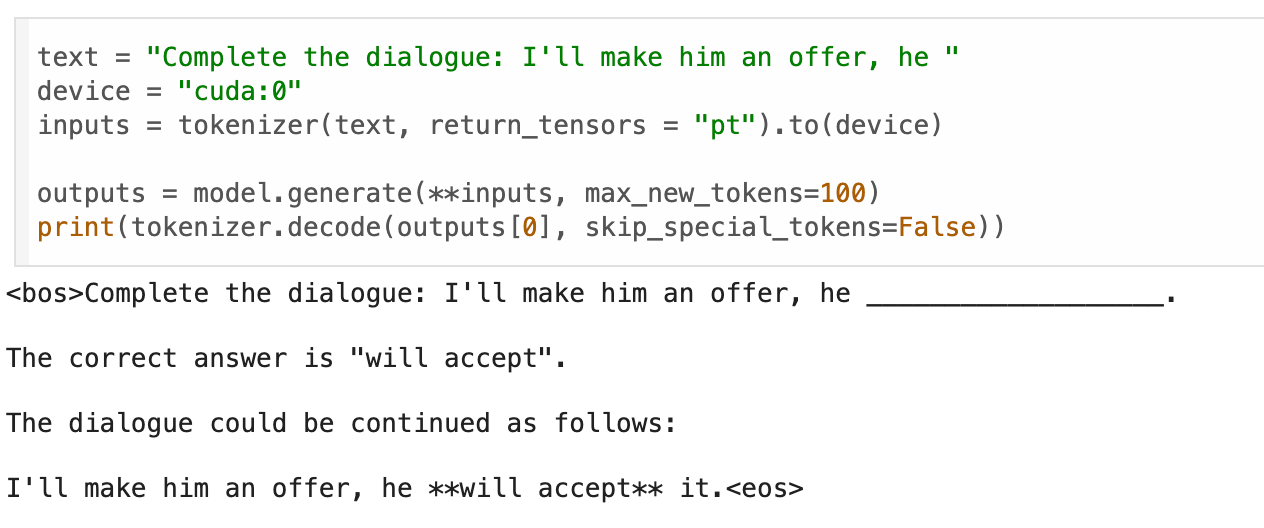
It does a pretty good job!
Step 2: Configure LoRA settings and load the dataset
LoRA allows for efficient fine-tuning of large models by updating only a small set of parameters, enhancing their performance on specific tasks without the need to retrain the entire model. To start with the fine-tuning process with LoRA, let’s configure LoRA configs which include the rank of adaptation matrices, target modules, and type of task.
To add to that let’s take a step forward and get our dataset from HuggingFace as well and map it as per our requirement.
# Configure LoRA
lora_config = LoraConfig(
    r = 8,
    target_modules = ["q_proj", "o_proj", "k_proj", "v_proj",
                      "gate_proj", "up_proj", "down_proj"],
    task_type = "CAUSAL_LM"
)

# Get the data
data = load_dataset("Aashi/Science_Q_and_A_dataset")
data = data.map(lambda samples: tokenizer(samples["Question"], samples["Context"]), batched=True)

def formatting_func(example):
  text = f"Answer: {example['Answer'][0]}"
  return [text]
Step 3: Configure supervised fine-tuning parameters
Supervised Fine-tuning or SFT leverages the pre-trained knowledge of an LLM and refines it for a particular task using labeled data. In this step, we are going to configure the SFT trainer pipeline which takes in the model and dataset along with some transformer training arguments that control various aspects of the training process as mentioned below:
per_device_train_batch_size: This defines the batch size of training examples per device (GPU or TPU) during training.gradient_accumulation_steps: This accumulates gradients for a specified number of steps before performing an update, improving efficiency with limited memory.warmup_steps: This gradually increases the learning rate from 0 to its specified value over the warmup steps.max_steps: This defines the maximum number of training steps the model will undergo.learning_rate: This sets the learning rate for the optimizer, controlling how much the model weights are adjusted during training.fp16: This enables mixed precision training using 16-bit floating-point numbers (fp16) for some computations, potentially improving training speed with compatible hardware.logging_steps: This controls how often training metrics are logged and saved during training.output_dir: This specifies the directory where training outputs (logs, checkpoints) will be saved.optim: This defines the optimizer used for training. Here, it's set to "paged_adamw_8bit", likely a custom optimizer from the library supporting 8-bit operations for efficiency.peft_config: This defines the configuration used for PeFT. We used a low-rank adaptation (LORA) configuration.
trainer = SFTTrainer(
    model = model,
    train_dataset = data["train"],
    args = transformers.TrainingArguments(
        per_device_train_batch_size = 4,
        gradient_accumulation_steps = 4,
        warmup_steps = 2,
        max_steps = 75,
        learning_rate = 2e-4,
        fp16 = True,
        logging_steps = 1,
        output_dir = "outputs",
        optim = "paged_adamw_8bit"
    ),
    peft_config = lora_config,
    formatting_func = formatting_func

)
Step 4: Start model fine-tuning
Now, that all our configurations are in place, we can start the fine-tuning process. We ran the training for 75 epochs and our training loss declined pretty smoothly to 0.008200 within 30 epochs.
trainer.train()Step 5: It’s Inference time 🚀
Now that our model is fine-tuned to our dataset. Let’s ask it some science questions. Just pass in the prompt to the model via tokenizer pass in the max tokens and return the answer through tokenizer.decode.
text = "What is Hemoglobin?"

device = "cuda:0"

prompt = text + "\nAnswer:"

inputs = tokenizer(prompt, return_tensors="pt").to(device)

outputs = model.generate(**inputs, max_new_tokens=100, eos_token_id=tokenizer.eos_token_id)
answer = tokenizer.decode(outputs[0], skip_special_tokens=True)
print(answer)
The response generated by our model to the above code query:
What is Hemoglobin?
Answer: Hemoglobin is a protein found in redbeds and vaguely in vertebrates. It is responsible for carrying oxygen from the lungs to the tissues and removing impra impra impractically from the tissues to the lungs.
That’s Impressive ✨
Note: The model may sometimes generate some junk words. A solution to that would be to feed in more data and make sure that model is trained on enough data to overcome generating such words.
Step 6: Save the fine-tuned model
In this step, we save and merge the fine-tuned model with the base model. We start by saving the fine-tuned model followed by loading the base model from HF. Then we merge both base and fine-tuned models and save the merged model as “fine_tuned_science_gemma2b-it”. It then saves both the merged model and its tokenizer for later use.
fine_tuned_model = "fine_tuned_science_gemma2b-it_unmerged"
trainer.model.save_pretrained(fine_tuned_model)

# Push the model on Hugging Face.
base_model = AutoModelForCausalLM.from_pretrained(
    model_id,
    low_cpu_mem_usage = True,
    return_dict = True,
    torch_dtype = torch.float16,
    device_map = {"": 0}
)

# Merge the fine-tuned model with LoRA adaption along with the base Gemma 2b-it model.
fine_tuned_merged_model = PeftModel.from_pretrained(base_model, fine_tuned_model)
fine_tuned_merged_model = fine_tuned_merged_model.merge_and_unload()

# Save the fine-tuned merged model.
tokenizer = AutoTokenizer.from_pretrained(model_id, trust_remote_code = True)
fine_tuned_merged_model.save_pretrained("fine_tuned_science_gemma2b-it", safe_serialization = True)
tokenizer.save_pretrained("fine_tuned_science_gemma2b-it")
tokenizer.padding_side = "right"
And it's done 🚀 We have successfully fine-tuned the Gemma2b-it model on our custom dataset and now it’s ready to be deployed on your Android device.
Resources for you ⭐️
- Part 1: Step-by-Step Dataset Creation- Unstructured to Structured: https://medium.com/p/70abdc98abf0/edit
- Part 3: Deploying SciGemma on Android: https://tiwarinitin1999.medium.com/5bac532c54b7
- Fine-tuned model on 🤗: https://huggingface.co/NSTiwari/fine_tuned_science_gemma2b-it
4. Check out the complete code here: https://github.com/NSTiwari/Gemma-on-Android/blob/main/fine_tune_gemma_model.ipynb
If you have any queries or questions, feel free to connect with Nitin or me on LinkedIn.
Acknowledgment

This project was developed during Google’s ML Developer Programs Gemma sprint. We thank the MLDP team for the opportunity.
